Advertisement

We need your help now

Support from readers like you keeps The Journal open.

You are visiting us because we have something you value. Independent, unbiased news that tells the truth. Advertising revenue goes some way to support our mission, but this year it has not been enough.

If you've seen value in our reporting, please contribute what you can, so we can continue to produce accurate and meaningful journalism. For everyone who needs it.
music to your ears

Here's how you can create your own ringtone

For those who yearn for the days of having your favourite song play when their phone rings.

REMEMBER WHEN RINGTONES were all the rage a few years ago? It was a simpler time when we had Nokia 3210s and used phones the size of a brick. But as phones became smarter, custom ringtones were replaced by more generic ringtones and sounds.

However, it’s now easier than ever to relive some of the glory and bring custom ringtones to your smartphone. Here’s how.

iPhone

The least straightforward of the three. Before you start,  you will need the latest version of iTunes and the song/music of choice saved on it.

A ringtone can be as long as 30 seconds so make sure the section you’re picking for your ringtone doesn’t get annoying after a few rings. Once you’ve that decided, it’s a case of creating that file.

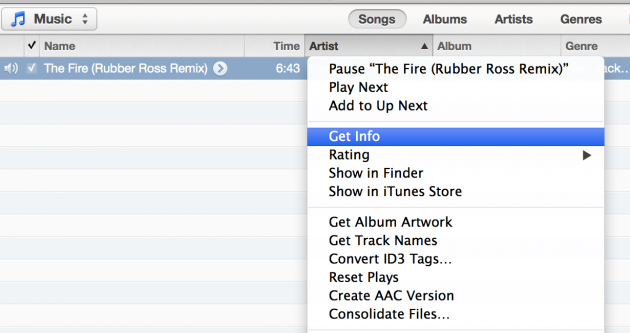
First, right-click the song on iTunes and select ‘get info’.

get info

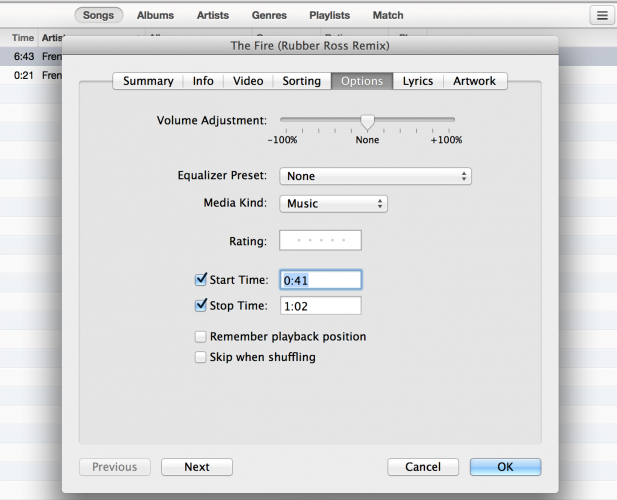
Then in the options tab, enter the start and stop time of the clip you want (remembering that it should be less than 30 seconds) and press ok.

options

Now right-click the song again and click on ‘Create ACC version.’A new shortened version of the song will appear.

Drag this file and save it on your desktop or folder (Anywhere where you can easily find it) and rename the file extension from m4a to m4r.

(If you’re using Windows and you can’t do this, it’s because it’s hiding the file extension name. If you go to Start > Control Panel > Appearances and Personalisation > Folder Options and click the view tab, you will see an option to untick a box for ‘hide extensions for known file types’.)

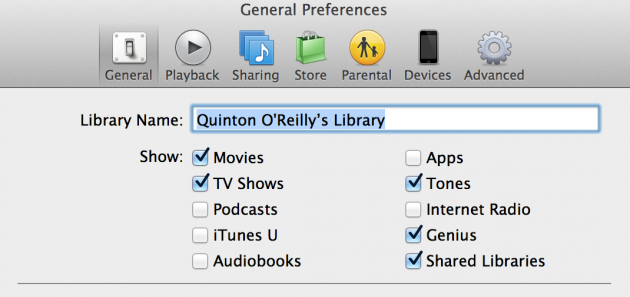
Now connect your iPhone to your computer, but before you add the ringtone to iTunes, check to see if the tones option is available first. If it’s not, you will need to go into File (iTunes if you’re using a Mac) > Preferences and under the general tab, select tones. Close and then restart iTunes.

Library tones

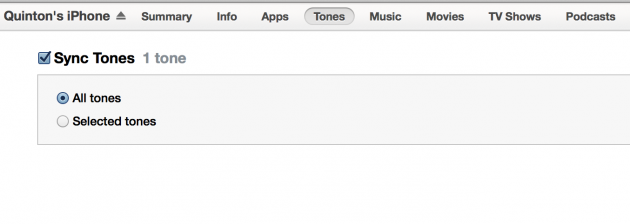
Now drag the ringtone from wherever you saved it onto iTunes and it will save under Tones. Go into your iPhone settings, select Tones > Sync all and click apply. That’s the hard part out of the way.

Screen Shot 2014-07-12 at 14.54.55

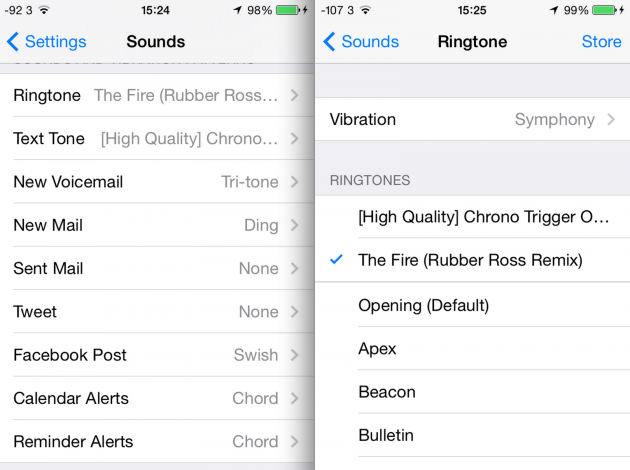
Now it’s a matter of selecting it as your ringtone. Go into settings > Sounds > Ringtone and lo and behold, your new ringtone is there for you to select.

iPhone screenshots

Android

For Android, the process is more straightforward since you can simply download an app to get the job done.

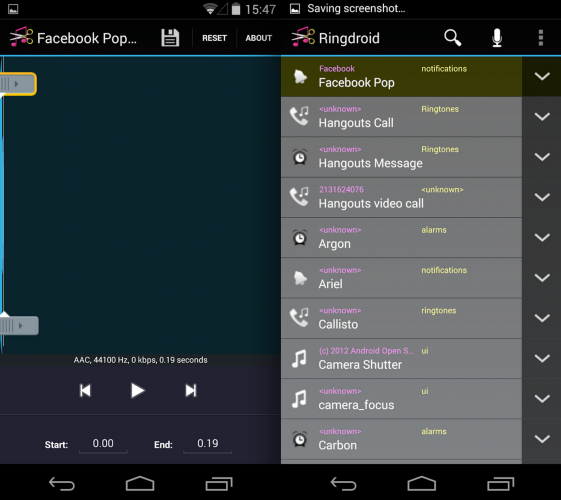
One of the more popular examples out there is Ringdroid which, while looking rather dated now, allows you to create ringtones from existing music files on your phone.

It also allows you to assign custom ringtones to specific contacts should you want to mix it up a bit.

Ringdroid Ringdroid / Google Play Ringdroid / Google Play / Google Play

Windows Phone

Another easy way of adding new ringtones, although you will need your computer to fully complete this. First, you must download Zune (if you haven’t already) before you can do anything.

It’s a matter of editing the file in Zune, (clicking edit and choosing/typing ringtone in ‘Genre’) and syncing the file to your phone. After that, go into settings and then into Ringtones + sounds and find the new file you added.

Read: Amazon applies for US delivery drone testing >

Read: Soon you could be able to roll up your TV and bring it with you >

Your Voice
Readers Comments
9
    Submit a report
    Please help us understand how this comment violates our community guidelines.
    Thank you for the feedback
    Your feedback has been sent to our team for review.