Advertisement

We need your help now

Support from readers like you keeps The Journal open.

You are visiting us because we have something you value. Independent, unbiased news that tells the truth. Advertising revenue goes some way to support our mission, but this year it has not been enough.

If you've seen value in our reporting, please contribute what you can, so we can continue to produce accurate and meaningful journalism. For everyone who needs it.

VOICES

Plucky Parsnips How to grow this versatile crop (plus other tips for May)

Most parsnip seed packets will tell you to sow them in February– don’t do it! Far better to leave it until now.

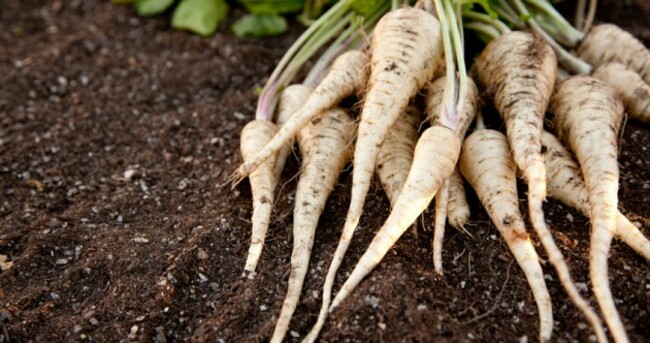
THIS WEEK I will be sowing my parsnips outside in the veg patch. Unlike carrots, they are relatively easy to grow (once you have persuaded them to germinate), and since they store well in the soil over the winter they are a valuable winter storage crop.

I grow around 40 parsnips which is more than enough to keep us happy between around November (when we start hankering for root crops) and next March. To do this I need to allocate around 2m of growing space (in a standard bed you will get three rows of parsnips).

Though I practice mainly a no-dig type of growing I always put a bit of work in to the root crop bed (where carrots and parsnips will be sown) – I start by turning over the soil with a fork (to a depth of a foot) which I think is the key to a decent crop since the roots can descend in to the soil happily, with no obstructions such as hard soil or stones to thwart their growth. I then rake the soil well to even it off before sowing and break up and large clods of soil.

Most parsnip seed packets will tell you to sow them in February – don’t do it. Far better to leave it until May when germination will be more reliable thanks to warmer weather. To sow, make a drill 2cm deep – if soil is dry, dampen. Sow one seed every 5cm in rows 30cm apart and cover in with soil. Germination takes up to three weeks. When seedlings appear, thin to 10cm apart for medium sized parsnips.

Once you have sown them, there is very little maintenance needed. Weed carefully until well established and watering shouldn’t be necessary except in dry spells. Parsnips are ready to rock when the foliage starts to die away in autumn but flavour improves after first frosts. Lift them out of the soil carefully with a fork. Leave in soil until ready to eat but lift by March.

Watch a short GIY video tutorial on parsnips here:

Sowing Guide for May

I think May is often the busiest of all months in the veg patch. There’s just as much sowing to be done as there was in April, but on top of that, seeds sown in the last few months are now starting to demand more effort (hardening off, planting out etc). May is also a great catch up month, when you can still sow veg you might have forgotten about in April such as spuds and onions etc. Though this week has been cold, growth has been good so far and here’s hoping we will have a mild May. Here’s the sowing plan for the month:

Outside direct in soil:

Parsnips and peas (early May) and carrots (in late May).

Inside in module trays or pots for later transplanting:

Squash, pumpkin, courgette, cucumber, leeks, cauliflower, kohlrabi, Brussels sprouts, French beans, runner beans, Florence fennel, beetroot, celery, swede.

Also this month do your regular monthly sowing of:
Salad leaves, oriental greens, calabrese and annual spinach.

Recipe of the Week – Nettle Tonic

Spring nettles are abundant right now, and they are at their best when young. They have all manner of health benefits: high in vitamins and minerals, blood-cleansing, anti-bacterial, anti-inflammatory, anti-allergy. A tea made from nettles (really an infusion) is a super tonic, or you could try making a nettle soup. Nettle tea has a rich and earthy taste that won’t appeal to everyone but you can sweeten with some honey or stevia leaf.

Ingredients:

  • A good bunch of fresh nettles, leaves and stems
  • Boiling water

Directions:

Obviously, if you are harvesting nettles from the wild, wear gloves or you will get stung! Choose young shoots and cut them rather than pulling (the plant will re-grow). Rinse the nettles under a tap, and then place them in a saucepan. Pour over boiling water and leave to infuse for 5 minutes or so. The ratio should be between a teaspoon to a tablespoon of nettle leaf to one cup of water – but you don’t need to be too rigid on that.

Tip of the Week – Red Spider Mite on Aubergine Leaves

Red spider mite is a common problem with aubergine plants, even at young plant stage. Leaves begin to appear pale and even eaten, and you can see the little red mites on the underside. A small infestation can be killed off by squashing with your thumb.

Garlic or seaweed spray will work as a prevention – spray leaves every week to 10 days. This will prevent attacks and strengthen the plants. For a homemade garlic spray add 3 crushed cloves of garlic to a tablespoon of vegetable oil and leave to soak overnight. Strain the mixture in to a spray bottled, add one tsp liquid soap and 1litre water. Shake well.

GIY’s vision is for a healthier, more connected and more sustainable world where people grow some of their own food. Each year we inspire and support over 65,000 people and 1,500 community food-growing groups and projects around Ireland, and run food-growing campaigns, events and publications. www.giyireland.com

Michael Kelly is a freelance journalist, author of ‘GROW COOK EAT’ and founder of GIY.

Beautiful Beetroot: delicious, nutritious and (most importantly) easy to grow

I wince at the phrase “green fingers” – everyone can grow their own food

Your Voice
Readers Comments
11
    Submit a report
    Please help us understand how this comment violates our community guidelines.
    Thank you for the feedback
    Your feedback has been sent to our team for review.