Advertisement

We need your help now

Support from readers like you keeps The Journal open.

You are visiting us because we have something you value. Independent, unbiased news that tells the truth. Advertising revenue goes some way to support our mission, but this year it has not been enough.

If you've seen value in our reporting, please contribute what you can, so we can continue to produce accurate and meaningful journalism. For everyone who needs it.
GIY
VOICES

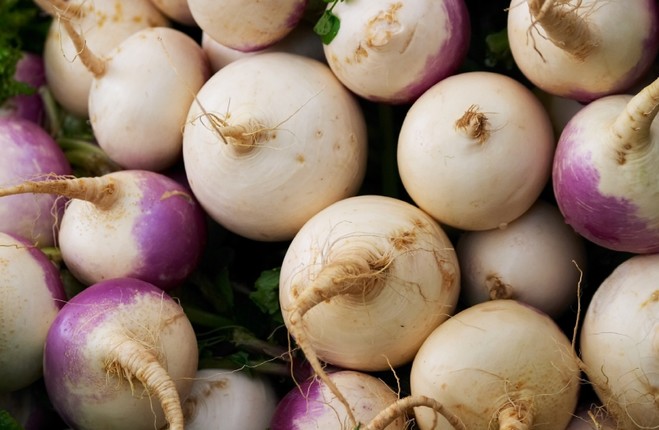
Turnip up a veg that is tasty and easy to grow

Michael Kelly continues his Grow It Yourself series with white turnips – perfect for casseroles and soups.

THE CLASSIC IRISH yellow “turnip” is actually a swede which is a different, though related, vegetable.

Real turnips are incredibly quick growing – you can harvest them just two months after sowing – and white-fleshed. They are generally problem free and very tasty, particularly if harvested when not much larger than a golf ball.

If you have a polytunnel or greenhouse, you might just get away with a sowing now and have a crop of these delicious baby turnips in about five weeks time.

Sowing

For a consistent supply of lovely baby turnips, I sow a couple of small module trays every two to three weeks or so from March until August – depending on the weather you might get away with an even earlier (February) and later (September) sowing.

The general advice is that turnips don’t transplant well and that you should always sow them directly. Because I am a contrary git, I’ve always ignored this advice and sown them in module trays, which works perfectly well for me.

I sow one or two seeds in each module of the tray 2cm deep. They will germinate in about a week (you’ll need to thin out the weaker seedlings) and will be ready for planting out about three weeks later.

Harden off early sowings. Plant seedlings out, spacing 30cm between rows and plants. Do not plant turnips where there have been brassicas for at least three years previously.

Ideally, you want to have added some manure or compost to the soil the previous autumn – if you didn’t get a chance then scatter some general purpose organic fertiliser like poultry manure and seaweed pellets.

It’s a very good idea to do a sowing at this time of the year, perhaps in a bed freed up from another crop (e.g. onions or garlic). The turnips will be ready to eat (and much appreciated) in October before the weather turns bad.

Growing

[image alt="" src="http://cdn.thejournal.ie/media/2016/09/shutterstock_335635883-296x197.jpg" width="296" height="197" title="" class="alignnone" /end]

Keep plants free of weeds and water regularly during dry weather. If the soil dries out, you end up with woody turnips.

The plants won’t need feeding if you have added compost/manure to the soil the previous year.

Harvesting

Harvest when the roots are 5-10cm in diameter. This can be as early as five weeks after sowing.

Turnips will not store as well as swedes – hence it’s not a good idea to sow too many of them.

Harvest by pulling the root from the ground by the stem, and use immediately.

Recommended Varieties

Here in GIY, we’re a particular fan of the baby turnips varieties Tokyo Cross and Snowball. We also like the beautiful Milan Purple Top.

Problems

Turnips are relatively easy to grow, but they can be affected by the same problems that afflict all brassicas, though they are rarely as badly impacted. Cabbage Root Fly, clubroot, and flea beetles are the main culprits.

GIY Tips

  • For a cluster of small, golf-ball sized roots, sow three or four seeds in each module of a module tray and rather than thinning out, plant them out in a group, allowing them to grow on together.
  • Young turnip “tops” – the leaves on top of the root – can be cooked and eaten as spring greens.

Recipe of the Week – Baked Baby Turnips in a Mustard Vinaigrette

[image alt="Turnip" src="http://cdn.thejournal.ie/media/2016/09/turnip-2-296x211.png" width="296" height="211" credit-source="Shutterstock" caption="File%20photo%20of%20baked%20turnip" class="alignnone" /end]

At school we used to get big steaming piles of boiled yellow turnip as the side veg almost every day – it’s created somewhat of an aversion to the classic Irish mashed yellow turnip (I can conjure up the smell as I write this). But these mild little-baked beauties are a different beast altogether – delicious and tender.

Ingredients:

  • 1 tablespoon white wine vinegar
  • 1 ½ teaspoons whole-grain mustard
  • 1 scallion, minced
  • 1 or 2 tablespoons chopped flat-leaf parsley
  • ½ cup extra-virgin olive oil
  • Salt and freshly ground pepper
  • Approx 20 baby turnips, stems trimmed to 2 inches

Directions:

Preheat the oven to 200° C.

In a bowl, whisk the vinegar with the mustard, scallion, parsley and ¼ cup of the olive oil. Season the vinaigrette with salt and pepper.

Heat a baking tray in the oven.

Cut the turnips in half through the stems; quarter them if large.

In a large bowl, toss the turnips with the remaining oil and season with salt and pepper.

Spread the turnips on the preheated baking tray and roast for about 18 minutes, until tender.

Transfer the turnips to a platter and let cool. Drizzle with the vinaigrette and serve.

Michael Kelly is a freelance journalist, author and founder of GIY. You can learn more about growing, and shop for seeds and gardening accessories, on the GIY website.

Click here for more tips on how to grow your own veg.

Your Voice
Readers Comments
16
    Submit a report
    Please help us understand how this comment violates our community guidelines.
    Thank you for the feedback
    Your feedback has been sent to our team for review.