Sign in. It’s quick, free and it’s up to you.
An account is an optional way to support the work we do. Find out more.
Sign in. It’s quick, free and it’s up to you.
An account is an optional way to support the work we do. Find out more.
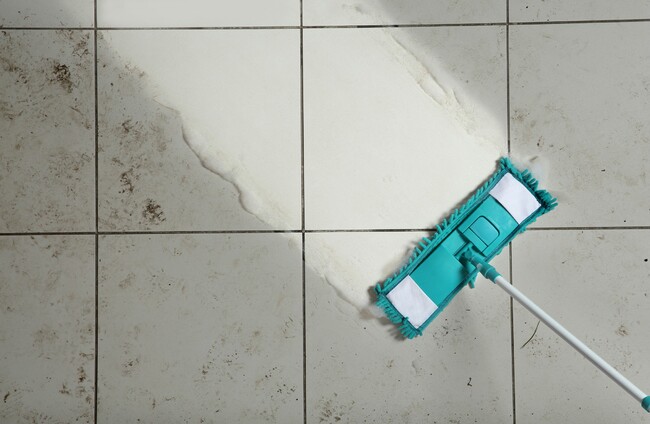
LAURA DE BARRA regularly brings her lifestyle and home maintenance masterclasses to the Glenveagh Home Magazine on TheJournal.ie. This week: how to mop tiled floors without leaving a single streak behind.
A well-cleaned tiled floor not only looks great, but it will have a longer life too. Using the right care, tools and products means your tiles and grout will stay in perfect condition for much longer than if you do it incorrectly (or not at all).
As with most things in life, there is an art to mopping a tiled floor. Do it right and you’ll avoid common mopping complaints like streaks after drying, a sticky surface, discoloured grout or a floor that still looks dirty afterwards.
For a spotless streak free finish, here’s what to do.
First, opt for a microfibre mop
Avoid sponge and string mops for tiled floors. These absorb a lot of water, so they’re difficult to wring out properly and you’ll end up pushing dirty water around the tiles. They are also not ideal for scrubbing the grout as much as is needed. Over time, the grout will build dirt, grease and grime. Plus, string and sponge mops leave water and cleaning product on the grout which will actually attract more dust and dirt as it dries.
Microfibre mops are ideal for tiled floors. They don’t absorb too much water but also scrub really well. Microfibre has charged fibres that grab dirt and pull it from the surface of the floor. Afterwards, it’s simple to clean and will dry quickly after use.
Second, choose the right cleaning product (or stick with water)
It is super important to choose the right cleaning product here. If you use something not designed for floors, like washing up liquid, you’ll end up with streaks and stickiness. Another important rule: look for a non-scratch cleaner that won’t damage the sealant on your tiles. The sealant is the thin layer on top of the tile that, if damaged or scratched, will allow dirt to become lodged underneath.
One of the best cleaners for tiles is warm water, as it lifts the dirt easily. Mop with water first, then go over the tiles again with a water/vinegar mix (first making sure it’s okay to use acidic products on your tiles) and you’ll be good to go. This water-vinegar mix is a non-toxic, natural alternative to chemical cleaners, so it’s a great option if you have pets or kids who love to hang out on the floor.
If you wish to go for a store bought cleaner, choose a cleaner that is designed for tiled floors. This will have a quick drying time, which means no streaks and zero chance of it attracting dirt as it dries.
Third, don’t leave to air dry
Letting tiles air dry can lead to water spotting, particularly in hard water areas. To avoid this, buff dry with a microfibre cloth after mopping
Ready to mop? Here’s your step by step guide
Want more tips and hacks? Laura de Barra’s debut book, Gaff Goddess: Simple Tips And Tricks To Help You Run Your Home is on shelves now, published by Transworld Ireland. Buy it here or in all good bookshops, and follow Laura on Instagram for even more cleaning and lifestyle tips.

To embed this post, copy the code below on your site


have your say