Sign in. It’s quick, free and it’s up to you.
An account is an optional way to support the work we do. Find out more.
Sign in. It’s quick, free and it’s up to you.
An account is an optional way to support the work we do. Find out more.

THERE WAST definitely a slight feeling of spring in the air last weekend and I spent a pleasurable, though backbreaking, couple of hours working on new lazy beds in the veg patch.
Lazy beds are a traditional way of creating what are effectively raised beds without the timber sides. Given the work that goes in to maintaining them, I always smile at the idea of calling them “lazy” beds. It is in fact a complete misnomer because they are much harder work to construct and maintain than a timber-framed raised bed.
The lazy bed was traditionally used as an attempt to overcome poor, shallow and infertile (and often boggy, turf) soils that were difficult to grow in. They were particularly effective in mountainous regions where the short growing seasons made holding soil warmth a problem.
Poignantly, the remains of famine-era lazy beds can still be seen on the side of mountains in many parts of the West of Ireland, particularly in County Mayo. The fact that they have survived in tact, suggests that they were abandoned suddenly – in that sense, they are as agonising a snapshot of death and devastation as the grizzly casts of Vesuvius victims in Pompeii.
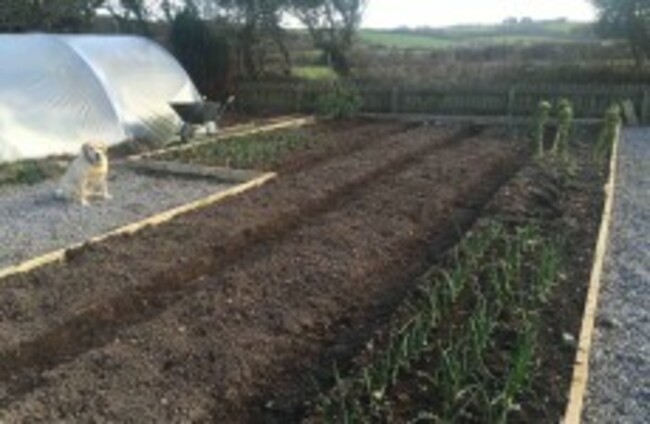
Though I have some timber-framed raised beds in the veg patch, I also have a large lazy bed area about 10m long and 5m wide. Within that space I have parallel banks of beds each about 4ft wide and separated by trenches one foot wide. I sow crops in rows in the long beds while the trenches are used as paths and for drainage.
The trenches are exactly a rake’s width – regular raking keeps them weed free and creates a fine tilth of soil which is then drawn up on to the beds and raked in. This simultaneously deepens the trenches and raises the beds. Several years of cultivation this way has created good soil quality.
Though I get a kick out of the fact that I am helping to preserve a once-widespread growing tradition, lazy beds are not purely nostalgic. They enjoy all the practical benefits of a timber-framed raised bed.
They are well suited to areas that lack deep soil or where drainage is a problem. The beds are drier and therefore warmer than the flat land around them. They warm up more quickly in the morning and retain their heat longer in to the evening. The effectiveness of lazy beds for drainage can be seen in my garden on very wet days, when the trenches on either side of the beds can be filled with water.
Creating a lazy bed is also a very effective way of sowing spuds directly on to lawn grass.
Traditionally a spade called a ‘Loy’ was used for this – the potato was laid on the grass and then the loy was used to turn a sod of earth over the spud from the side. So, in other words instead of planting the spud down in to the soil, you are placing it on the surface and creating a layer of top soil above it.
The bonus is that as the grass in the sod rots away it provides nutrition to the spud. Incidentally, it is believed that they were called lazy beds because the English called the potato the “lazy root”, and not because the method of cultivation suggested laziness. I can vouch for that..!
Things to do this Week – Sowing
I got busy in the potting shed this week, doing my first major sowing of the year of salad greens and herbs. Each month from March to September, I do a small sowing of what I loosely describe as salad greens (lettuce, annual spinach and oriental greens such as mustard, pak choi, mizuna, rocket etc) as well as annual herbs (such as coriander and dill).
These are sown in module trays in the potting shed where they will benefit from the warm conditions, and then will be planted out about a month later in the soil (earlier sowings in the polytunnel, but later ones outside).
This approach gives a consistent supply of interesting leaves and herbs for the salad bowl for most of the year. Check out a short video tutorial on sowing lettuce here.
Recipe of the Week – Bulgar Wheat Salad with Butternut Squash
I am a huge fan of the squash variety Crown Prince which produces big round squashes with a thick blue skin, and vibrant orange flesh. Thanks to last year’s growing, we had five or six of these bad boys on top of the dresser in the kitchen and this week I hacked open the last one (sob).
Half of it went in to a lovely curry and I used the other half for this delicious salad – the flavour of the squash really is superb, bringing an incredible sweetness to any dish it graces. I love the crunchy nuttiness of bulgar wheat too. I found this recipe on the blog Amuse Your Bouche.
Ingredients:
Instructions
Peel the squash and chop it into 1cm dice. Toss it in 1tbsp of the olive oil, and roast for 20-30 minutes at 200°C (Gas Mark 6 / 400°F), until it is soft and just beginning to crisp up. Meanwhile, boil a panful of water and dissolve the stock cube.
Add the bulgur wheat, and turn off the heat. Cover the pan, and leave the bulgur to soak for around 20 minutes, or until soft. Drain any remaining liquid, and immediately stir half of the rocket into the bulgur to wilt it.
In a small bowl or mug, combine the balsamic vinegar, the remaining 3tbsp of olive oil, and the minced garlic, and stir this dressing through the bulgur.
Serve the warm bulgur wheat with the roasted squash, the chopped walnuts, the crumbled goat’s cheese and the remaining rocket.
Tip of the Week – Beware of Frosts
Emerging young potato plants can be killed by frosts so as the plants start to appear above the soil you have to be vigilant. Cover young plants if there is any risk of frost. Fleece is the best option for this, though you could also use straw or even a covering of plastic – be sure to take the covering off by day.
Alternatively you can ‘earth up’ the plants as they appear by covering them with more soil – this will protect the plants from frost. You can buy fleece on the GIY webshop.
Michael Kelly is a freelance journalist, author of ‘GROW COOK EAT’ and founder of GIY. GIY’s vision is for a healthier, more connected and more sustainable world where people grow some of their own food. Each year we inspire and support over 60,000 people and 800 community food-growing groups and projects around Ireland, and run food-growing campaigns, events and publications. www.giyireland.com
To embed this post, copy the code below on your site


have your say